- You are here:
- Home »
- Blog »
- Natural Nutrition »
- Discover the Health Benefits of Growing Your Own Microgreens
Discover the Health Benefits of Growing Your Own Microgreens

How would you like to add more organic or natural nutrition at a very affordable cost for you and your family? Fresh organic greens even in the dead of winter?
It’s easier than you think with microgreens. In this post, we’ll take a look at how you can grow your own microgreens in a small space with only a little preparation and very affordably as well- even for families that do not have room for a garden.
Microgreens have been around since the 1980’s. Nevertheless, most people don’t know a lot about them. In the last decade however, they have begun to trickle into restaurants and recipe books across the nation.
Typically only found in fine dining restaurants perhaps as a garnish on a soup or salad, they turn out to be little power houses of nutrients that you can be eating at home to take advantage of their abundance of nutrients- cheaply too.
The growth in popularity of these “greens” can be attributed to their newborn recognition as a super-food which has arisen because of their impressive nutritional content and profusion of health benefits.
What Are These Microgreen Thingy’s Anyway?
Although you were not aware of them as such, you probably had your first
encounter with microgreens during your childhood without even recognizing it.
Remember those silly looking Chia pet commercials on TV? The little terracotta figurines of dogs, cats and some other creative figures that you could water and grow in about a week or so like mini sculpture gardens. Well, those sprouted chia seeds producing the green fur or hair are simply one type of microgreen.
Turns out those little chia seeds are a relative of the mint family known for their super-food properties like antioxidant nutrients, omega 3-fatty acids, and other essential nutritional goodies.
What the Chia pet advertisers didn’t mention in the commercials is that those little green sprouts would be much better additions to a salad, pasta, or smoothie instead of being cultivated for appearance only on a terra cotta statue.
Fortunately, we know much more about microgreens and their numerous health benefits now than we did several decades ago, so we can begin to cultivate microgreens to help our health instead of only using them for novelty mini-gardens.
While chia seeds are probably the best known example in popular culture, they are far from the only variety of microgreen in the world.
In reality, microgreens are the sprouted results of common herbs, vegetables, and even edible flowers that are harvested within the first 14 days after they emerge from their seeds.
Unlike sprouts, which are used pretty quickly after they spring up either from a jar or shallow soil holding tray, microgreens are between 1 to 1.5 inches tall, have a “true” set of leaves, and do not include their roots.
What Kinds of Microgreens Are Most Common These Days?
First of all, microgreens come in a rainbow of different colors and textures, with flavors ranging from mild to bitter to spicy. Essentially, they’re miniaturized versions of the herbs and vegetables which you normally encounter in a supermarket or restaurant.
In their smallest form, those veggies are packed full of additional vitamins and nutrients that are lost as the plant naturally ages. That’s because the plant needs those nutrients to grow to maturity. We do too.
That’s what makes the microgreen a super-food for us. While the adult
versions of these seeds are still beneficial, the baby versions carry even more punch in other ways. We’ll go over a few of them later on in this article.
Here are some of the most popular varieties of microgreens according to Fresh Origin Farms, a farm that specializes in growing these tiny greens:
- Arugula
- Beets
- Celery
- Chard
- Chervil
- Cilantro
- Fennel
- Green Basil
- Kale
- Parsley
- Radish
- Red Cabbage
- Sorrel
- Spinach
There are other varieties as well, but these are the ones you are most
likely to encounter at a grocery store, farmer’s market, or restaurant.
Health Benefits of Microgreens
Don’t let their midget size fool you. Microgreens are gold mines of essential vitamins and nutrients. Microgreens have a number of health benefits which include:
- Boosting your immune system
- Enhancing your heart, bone and joint health
- Lowering your LDL (low-density lipoprotein cholesterol- Considered a cardiovascular risk factor)
- Reducing your risk of diabetes
- Adding positive nutrients like vitamin C, calcium, vitamin K, iron, omega-3 fatty acids, amino acids, and antioxidants.
All the same good things found in full-grown vegetables, right? Well, not quite.
A scientific study by the University of Maryland published in 2012, revealed that microgreens contained up to forty times the nutritional content of adult plants of the same species. Results that surprised the researchers so much that they re-checked them many times.
Here’s a breakdown of some of the most common varieties of microgreens and the health benefits they offer:
- Arugula: Antioxidants to boost your immune system
- Beet: High in iron and vitamin K
- Chia: Loaded with antioxidants, fiber, and omega-3 fatty acids for heart health
- Cilantro: High in beta-carotene, lutein, and zeaxanthin for eye health
- Fennel: Amino acids for muscle and brain health
- Kale: Immune-system boosting vitamin C and cancer-fighting antioxidants
- Lettuce: High in antioxidants to help your body fight sickness
- Red cabbage: Saturated with vitamins C, E, and K, and also thought to lower LDL (low-density lipoprotein) cholesterol
- Sunflower: High protein content which is great for athletes and bodybuilders
As you can gather from the list above, there are impressive benefits which offer good reasons to include microgreens in your diet. Plus, they make a good source of fresh greens even in the dead of winter.
Another point to consider is that since each green has its own unique nutritional makeup, it is a good idea to grow or buy a variety of these greens and mix them together to insure a good variety and balance of nutrient benefits.
Enough about their nutritional value, let’s now talk about the most important part of microgreens- eating them!
What Are Microgreens Used For?
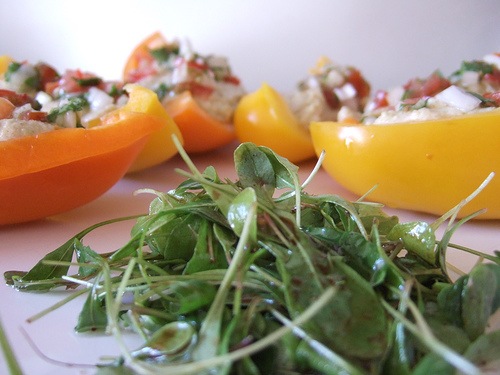
As mentioned above, microgreens can be used as a garnish. Even though they are small, they offer an easy opportunity to add nutrition, color, flavor, and texture to meals.
In addition to being used as a garnish, they can also be used with sandwiches in place of or along with lettuce.
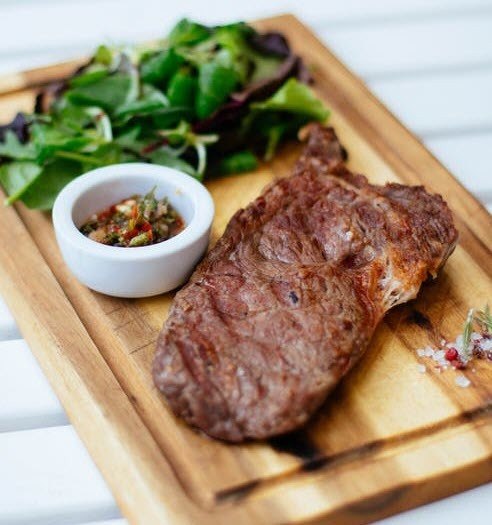
They can also be used along with soups, and pastas. added to smoothies, served as side dishes and more. Cookbooks are available on amazon for more ideas, but you can add them to quite a few dishes for an extra dash of flavor and nutrition.
Additionally, microgreens are easy to prepare because cooking them is not recommended because of their super-food nutritional content as is. Instead, gently wash them to remove any dirt or bacteria and simply mix them in with other greens, like salad leaves, or place them on top of your meal as a vitamin-packed garnish.
Since microgreens have spiked in popularity, there are a lot of recipes out there for all different flavor palettes and experience levels. Dishes range from the gourmet to the down-to-earth practical. There are even recipes specifically for people who are not fans of salad!
As mentioned above, you can use a handful of microgreens to garnish beverages or blend them into your smoothies. Since many microgreens are just younger versions of traditional cocktail mixers like mint and basil, it’s not as strange as it sounds. You can have all the health benefits of a veggie salad while sipping on a cool, refreshing beverage.
All told, microgreens are wonderfully healthy and easy to cook with. Since they are derived from common vegetables and herbs, it’s fairly easy to incorporate them into recipes you already enjoy and use regularly as a change of pace to a standard dish.
Use your own cooking imagination to discover other new and innovative ways to introduce them into your diet. Purchase a microgreens cookbook or two and develop your expertise as a microgreen chef from there.
Now, let’s move on and learn more about how you can kick-start your own personal container garden by using things you already having around your living space. Other resources will be suggested to help you as well.
How to Grow Microgreens
Much of the microgreen popularity stems from their immense health benefits. However, some of their recent gain in fame is also attributable to how easy they are to grow on your own.
Unlike full-sized vegetables and herbs which require a large garden, or at the very least a suitably sized outdoor container garden, microgreens can grow in a small indoor space with minimal maintenance.
Although microgreens can be purchased at many grocery stores, they can be very pricey at $30 a pound. Not to worry. You can grow your own with much more variety of choice much more economically. Just takes a little initiative and preparation, but not a whole lot of maintenance which helps as well for those who think they aren’t the “green thumb” type.
For perspective on the price, you can get a seed packet from your local
greenhouse or hardware store for $1-$3 per packet. Growing them on your own then is already a budget-friendly alternative for having fresh greens at the ready for mealtime.
All you need are the seeds, and a few simple items to get started. Then, you need to keep them alive for about 10 days and you will be able to harvest a crop of your own.
Here are some popular, beginner-friendly seeds to get started on:
- Cabbage
- Sunflower
- Cauliflower
- Broccoli
- Mustard
- Chia (of Chia Pet fame!)
- Cilantro
- Kale
- Arugula
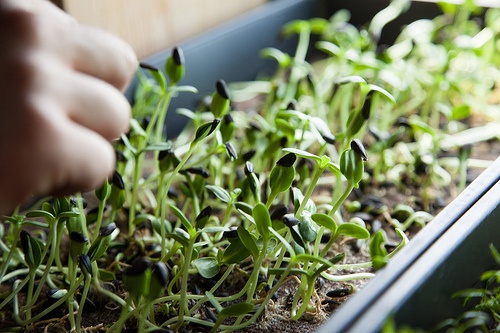
Once you select your seed variety, you will need a container and a sunny spot to grow your seedlings in. You can even use disposable pie containers or plastic take-out trays for growing so there doesn’t need to be a large investment made there.
While you don’t need to heavily water the seeding medium, as a precaution poke a few holes in your containers to ensure your seedlings don’t drown. You may also want to provide a drainage plate underneath them to prevent your growing space from getting over watered too.
Once you select a growing container, scoop in a thin layer of soil. Use the best quality soil you can get. That is, composted from organic matter or a high quality top soil. Even in the winter planting soils are available from many local and even online sources.
The higher quality the soil. the better the nutritional result since if it isn’t in the soil, it will not be in the plant. You can add worm castings or other organic boosters to the soil as well to add nutrient value. Good soil is an important step. Don’t cut corners here if you can avoid it. Otherwise, start with what you have and boost it later.
You can also use a growing medium like coco coir for microgreen growing. Coir is a by-product of coconut shell production whereby they use the fibers in coconut shells to produce rugs and mats. The remainder has been very successfully used to grow seedlings and microgreens. See my posts on growing seedlings for much more details on how to use coco coir as a soil medium.
Ideally, you want 1-2 inches of soil for your seeds to take root in. Although they won’t be in there for very long, the nutrients in the soil will help them grow faster and healthier.
Once your container is filled with dirt, sprinkle your seeds on top of the soil. You can use one type of seed or even make up a mixture of different species in the same container. They should all grow at about the same speed.
Almost done! Once your seeds are in place, cover them with a little more soil- about a quarter of an inch. This helps protect them from drying out in the open air.
Once planted, locate your growing container in an area that gets some sun during the day. To keep them from drying out, you can mist them with water from a spray bottle. For more detail on the growing process see my posts on growing seedlings. The same suggestions will work with microgreen growing.
If this sounds like more work than you planned on signing up for, you can pick up a pre- assembled microgreen kit to get your windowsill micro-garden up and running quickly.
Harvesting Your Bounty
Regardless of which route you take with the set-up, your sprouts will be ready to harvest around 10-15 days after they emerge from their seeds, or about the time you notice they’ve grown their first set of “true” leaves.
To harvest your microgreens is really quite uncomplicated. Just take a clean pair of scissors and snip the stems of your microgreens just above the dirt.
For maximum freshness, it’s best to use them right away.
They can last up to 7 days if properly stored in a sealed bag inside your refrigerator but will lose nutrient value the longer they are stored. Once they start to look limp, soft, or discolored, you should throw them away and harvest a new batch.
So, now it’s your time to get started with your microgreen adventure. Discover how microgreens are the tiny, high-efficiency superfoods they claim to be.
Add these little nutritional powerhouses to your family menu and not only will you and your loved ones become healthier, but you will also add a fresh vegetable variety to your diet through any season, even those cold winters in cold climates when fresh greens are a scanty if not impossible to acquire food.
The benefits are far too inviting to pass up. Why wait?
Related Posts
Is Holistic Oral Care a Forgotten Part of Your Natural Health Treatment Plan?
8 Common Herbs With Amazing Health Benefits
Protein – Which Is Better for Your Health – Animal or Vegetable?
Bayer May Be Regretting Its Purchase of Monsanto As Glyphosate Cases Line Up
Do You Know What a CSA Is? If Not. Now Would Be a Good Time to Find Out.
5 Tips and Secrets Of Reading Food Labels for Better Health
What’s For Dessert? Superfood Fudge
The Secrets of Sugar – A Canadian Broadcast Presentation
